No Bake Pumpkin Cheesecake Bars – Creamy, Spiced, and Effortlessly Delicious
If you love fall flavors but don’t feel like turning on the oven, these No Bake Pumpkin Cheesecake Bars are the perfect dessert for you. They combine the cozy warmth of pumpkin spice with the creamy richness of cheesecake — all layered over a buttery cookie crust that’s as easy as it is irresistible.
No baking, no water bath, and no fuss. Just pure autumn comfort in every bite. These bars set beautifully in the fridge, slice cleanly, and deliver that silky, melt-in-your-mouth texture you crave in a cheesecake — without any of the usual hassle.
Whether you’re hosting Thanksgiving dinner, bringing dessert to a potluck, or simply indulging in a sweet fall treat, this recipe is a must-try. Quick to make and guaranteed crowd-pleasers, these pumpkin cheesecake bars taste like the best part of the season — in creamy, dreamy bar form.

Why You’ll Love These No Bake Pumpkin Cheesecake Bars
1. No oven required:
Perfect for warm kitchens or busy holidays — everything sets up right in the fridge.
2. Creamy and rich:
Smooth cream cheese and whipped topping give these bars a luscious, airy texture.
3. Full of fall flavor:
Pumpkin puree, cinnamon, nutmeg, and cloves blend together for that classic pumpkin pie taste.
4. Easy to make ahead:
These bars chill beautifully, making them ideal for preparing a day or two in advance.
5. Perfect for gatherings:
Easy to slice and serve — great for parties, family dinners, or gifting.
6. Naturally adaptable:
You can make them gluten-free or dairy-free with a few simple swaps.
What You’ll Need
For the Crust:
- 2 cups crushed graham crackers or gluten-free cookie crumbs
- 1/2 cup unsalted butter, melted
- 2 tablespoons brown sugar
- 1/2 teaspoon cinnamon
For the Cheesecake Filling:
- 16 ounces cream cheese, softened
- 3/4 cup powdered sugar
- 1 teaspoon vanilla extract
- 1 1/2 cups whipped topping or whipped cream
For the Pumpkin Layer:
- 1 cup pumpkin puree (not pumpkin pie filling)
- 1/2 cup brown sugar
- 1 teaspoon cinnamon
- 1/4 teaspoon nutmeg
- 1/4 teaspoon ginger
- 1/8 teaspoon cloves
- 1/2 cup whipped topping or whipped cream
For Topping (Optional):
- Whipped cream
- Crushed graham cracker crumbs or cookie crumbs
- A sprinkle of cinnamon or pumpkin spice
Step-by-Step Instructions
Step 1: Prepare the Crust
In a medium bowl, combine crushed graham crackers, melted butter, brown sugar, and cinnamon. Stir until the mixture resembles wet sand and is evenly moistened.
Press the crust mixture firmly and evenly into the bottom of an 8×8-inch square baking pan lined with parchment paper.
Use the back of a spoon or the bottom of a measuring cup to pack it down tightly.
Place the crust in the refrigerator while you prepare the filling.
Step 2: Make the Cheesecake Layer
In a large mixing bowl, beat the softened cream cheese with powdered sugar and vanilla extract until smooth and creamy.
Fold in the whipped topping (or whipped cream) gently until the mixture is light and fluffy.
Spread about two-thirds of this mixture evenly over the chilled crust, smoothing the top with a spatula.
Reserve the remaining one-third of the mixture for the pumpkin layer.
Step 3: Make the Pumpkin Layer
In a separate bowl, combine pumpkin puree, brown sugar, cinnamon, nutmeg, ginger, and cloves. Stir until fully blended and smooth.
Add the reserved cream cheese mixture to the pumpkin mixture and fold until evenly combined.
Then gently fold in the additional whipped topping until the texture is airy and mousse-like.
Step 4: Layer the Pumpkin Mixture
Carefully spread the pumpkin cheesecake mixture over the first cream cheese layer, smoothing the top with a spatula for an even finish.
Make sure the layers are distinct but gently pressed together so they set cleanly when chilled.
Step 5: Chill to Set
Cover the pan with plastic wrap or foil and refrigerate for at least 4 hours, or preferably overnight.
This allows the cheesecake layers to firm up and develop their flavor.
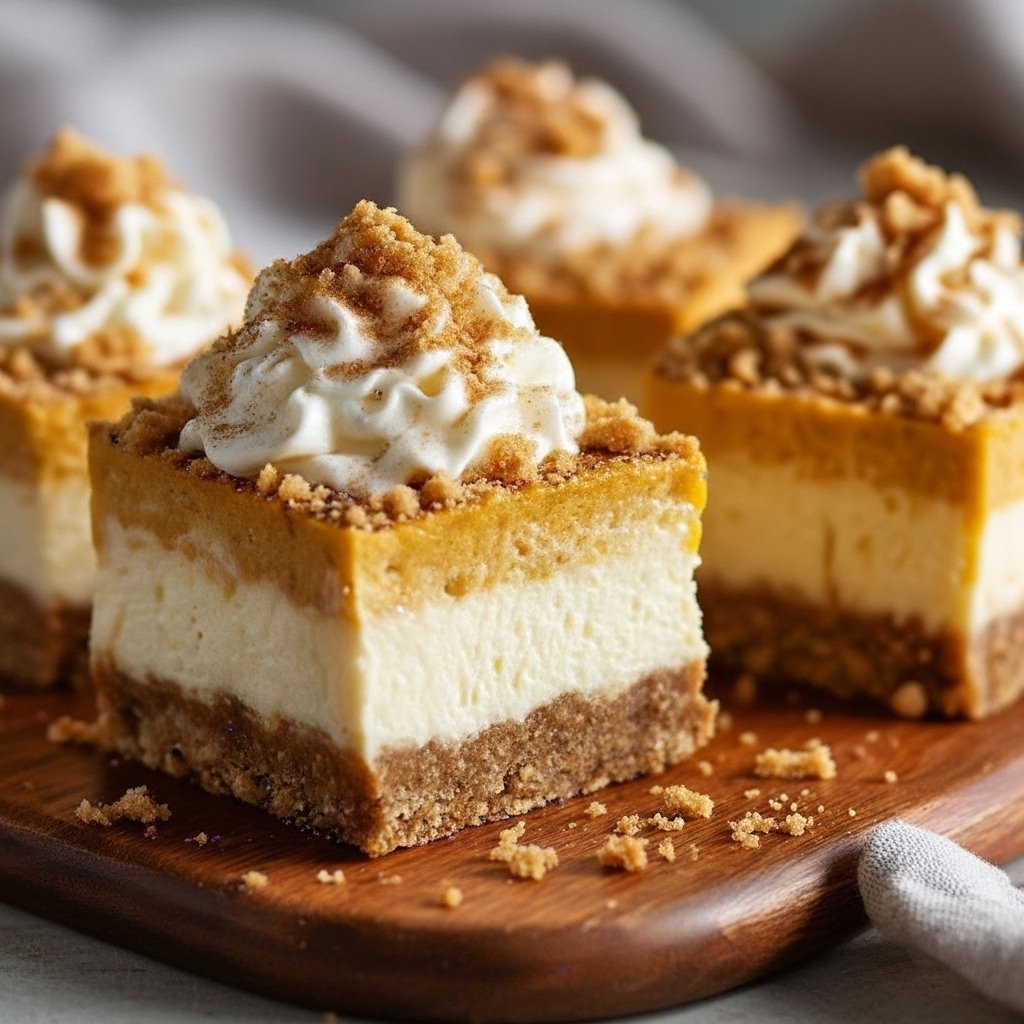
Step 6: Slice and Serve
Once chilled, lift the cheesecake slab out of the pan using the parchment paper overhang.
Place it on a cutting board and slice into bars using a sharp knife.
Wipe the knife clean between cuts for neat slices.
Top each bar with whipped cream, a sprinkle of cinnamon, or a dusting of cookie crumbs if desired.
Serve cold and enjoy the creamy, spiced layers in every bite.
Tips for Perfect No Bake Cheesecake Bars
- Use room-temperature cream cheese.
Cold cream cheese can lead to lumps in your filling. Let it soften fully before mixing. - Don’t overmix the whipped topping.
Gently fold it in to maintain that light, airy texture. - Pack the crust firmly.
This helps it hold together when slicing. You can also freeze the crust for 15 minutes for extra firmness. - Chill long enough.
At least 4 hours, but overnight is best for perfect texture and clean layers. - Use pure pumpkin puree.
Avoid canned pumpkin pie filling — it already contains sugar and spices, which can throw off the flavor balance. - For a firmer cheesecake texture:
Add 1 teaspoon of unflavored gelatin dissolved in 1 tablespoon of warm water to the filling before layering.
Flavor Variations
These pumpkin cheesecake bars are wonderfully versatile. Try these creative twists:
Spiced Gingersnap Crust
Replace graham crackers with crushed gingersnap cookies for a deeper, spicier flavor.
Maple Pumpkin Cheesecake
Add 1 tablespoon of pure maple syrup to the pumpkin layer for a rich, autumn sweetness.
Chocolate Swirl
Melt 1/2 cup of chocolate chips and drizzle into the top layer before chilling. Swirl gently with a knife for a marble effect.
Pecan Praline Topping
Top with chopped toasted pecans mixed with a little melted butter and brown sugar for a crunchy caramel-like topping.
Mini Cheesecake Cups
Instead of bars, divide the layers into small cups or jars for individual servings — perfect for parties or gifts.
Serving Suggestions
These creamy bars are best served cold, straight from the fridge. Pair them with:
- A cup of hot coffee or pumpkin spice latte
- Chilled apple cider
- Vanilla ice cream for an indulgent dessert plate
- Fresh whipped cream and caramel drizzle for extra decadence
They make a beautiful addition to your Thanksgiving dessert table, holiday potluck, or cozy fall night in.
How to Store and Freeze
Refrigerator:
Store the bars covered in the refrigerator for up to 5 days.
Keep them in an airtight container or wrap the pan tightly in plastic wrap.
Freezer:
Freeze individual bars on a tray for 1 hour, then wrap them in plastic wrap and place in a freezer-safe bag.
They’ll keep for up to 2 months.
To serve, thaw overnight in the fridge or at room temperature for about 20 minutes.
Make-Ahead Option
This dessert is ideal for making ahead since it needs time to chill.
You can prepare it 1–2 days in advance, cover tightly, and refrigerate until ready to slice and serve.
If freezing, prepare the layers as directed but skip the whipped cream topping until after thawing.
Troubleshooting
Crust falling apart:
Make sure to pack it tightly and chill thoroughly before adding the filling.
Filling too soft:
Chill longer, or use full-fat cream cheese and whipped topping for better structure.
Layers blending together:
Chill the first layer for 10–15 minutes before adding the pumpkin layer for cleaner separation.
Bars not firming up:
Refrigerate longer — no bake desserts need several hours to properly set.
Frequently Asked Questions
Can I make this gluten-free?
Yes — simply use gluten-free graham crackers or cookies for the crust.
Can I make it dairy-free?
Use dairy-free cream cheese (such as almond or coconut-based) and coconut whipped topping.
Can I use whipped cream instead of frozen whipped topping?
Yes, but stabilize it slightly with 1 teaspoon of cornstarch or gelatin if you want the bars to hold shape longer.
Can I add more pumpkin?
You can, but the filling will be softer. Stick to 1 cup for the best texture balance.
How can I make these bars firmer for clean slicing?
Freeze them for 30–45 minutes before cutting — this gives neat edges without affecting texture.
Nutrition Information (Approximate Per Bar, Makes 12)
- Calories: 270
- Protein: 4g
- Fat: 18g
- Carbohydrates: 22g
- Fiber: 1g
(Nutrition values vary based on crust ingredients and whipped topping used.)
Why This Recipe Works
This no-bake cheesecake recipe is all about smart layering and balance. The buttery graham cracker crust provides structure and crunch, while the cream cheese layer adds smooth richness. The pumpkin layer brings warmth and spice, creating that unmistakable fall flavor combination — all without a single minute in the oven.
By folding in whipped topping instead of baking, the filling sets light and airy while staying creamy. The refrigerator does all the work for you — letting the layers firm up naturally into a perfectly sliceable dessert.
Tips for Customizing Your Cheesecake Routine
- Add toppings before serving.
Whipped cream, caramel drizzle, or crushed cookies make great finishing touches. - Make a dessert board.
Pair these bars with mini pies, cookies, and other bite-size treats for a fall dessert spread. - Portion for parties.
Cut into bite-size squares or make mini versions in muffin tins. - Use seasonal twists.
Try adding apple butter, maple syrup, or chai spices for new flavor layers. - Decorate for the holidays.
Dust lightly with cinnamon or cocoa powder, or top with chocolate curls for an elegant touch.
Final Thoughts
These No Bake Pumpkin Cheesecake Bars are the ultimate fall dessert — creamy, spiced, and perfectly simple. With no oven required and minimal ingredients, they’re a stress-free way to enjoy the taste of pumpkin cheesecake anytime.
Each bite offers a balance of velvety smooth filling, warm spices, and buttery crust — everything you love about autumn desserts, minus the effort.
Whether you’re planning a cozy family dinner or looking for a festive dessert to impress guests, this recipe is a guaranteed hit.
Make them ahead, keep them chilled, and savor the flavors of fall — one creamy, dreamy bite at a time.